It's always good practice to monitor your CPU's temperature when you're overclocking it. This will ensure that it doesn't overheat to the extent it ends up suffering permanent damage.
In addition, people with a powerful laptop should be concerned about CPU temperature as well. Since they don't have nearly the same space as desktops, airflow can be pretty restricted. Hence, the former is likely to heat up faster.
How to check the temperature of CPUs? Is it difficult?
You don't have to be tech-savvy or buy expensive gear to check what temperature your CPU is running at. In this blog post, I'm going to introduce you to two free, easy-to-use CPU temperature monitoring tools.
Whether you’re using Windows 7 or windows 10 temperature monitoring should work the same when you’re utilizing these CPU heat monitor tools.
Contents
Core Temp is a no-frills desktop/ laptop temperature monitor. Let's take a look at how to use it.
First of all, download Core Temp from the official website and then install it on your computer.
Note: when you're going through the installation wizard, make sure to uncheck any additional software. Otherwise, you'll end up with a whole bunch of other tools that you have no use for.
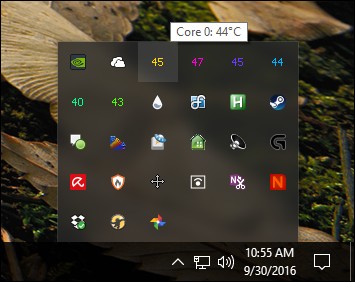
Once you’ve got it installed, you should see a series of numbers when you open up the system tray. These numbers refer to the temperature of each core in your CPU. For instance, if your CPU has 6 cores, then you should see 6 temperature readings.
You can click on any of these readings to pull up the main Core Temp interface. This interface will contain technical information about CPU including its click frequency and Thermal Design Power. Below this, you'll see a fairly comprehensive section for temperature readings, detailing the current, minimum and maximum temperatures recorded for each core in your CPU.
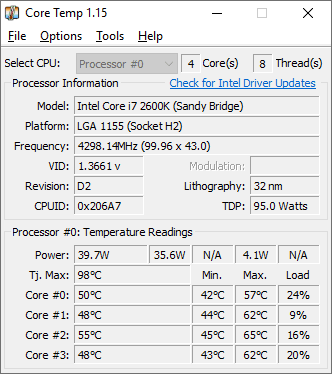
Take a look at the 'Tj. Max' value. It stands for Temperature Junction Maximum, and refers to the highest temperature at which your CPU can run, as specified by the manufacturer. So if your CPU hits this mark, then it is essentially overheating.
It's a good practice to keep your CPU cores about 10 to 20 degrees lower than the Tj. Max value. This will ensure that your CPU's lifespan isn't depleted.
In most cases, Core Temp can accurately identify the Tj. Max value of a CPU but it's always a good idea to visit the manufacturer's website and confirm. If Core Temp overestimates the Tj. Max value, then you may fail to see that you're overheating the CPU.
1) Start Core Temp with Windows: As the name implies, this causes the software to start monitoring the CPU temperature the moment you turn on the computer. This can be useful if you're consistently doing processor-intensive tasks on your PC.
2) Notification Area Icons: This allows you to tweak how Core Temp's icons appear in your system tray. You can choose between displaying the app icon and the actual temperature readings. I recommend the latter. You can also choose to display only the 'highest temperature' which means that you'll only be shown one temperature reading.
3) Start Core Temp Minimized: This well make sure that the app interface isn't loaded up when you get to the home screen of your computer. I'd recommend turning this on if you've selected 'Start Core Temp with Windows'.
4) Hide Taskbar Button: This makes sure that the app isn't displayed on the taskbar at all times.
5) Temperature Polling Interval: this determines how often Core Temp checks and updates the temperature readings. The default interval is set to 1000 milliseconds but you can set this to be higher or lower.
Note that the icon will blink every time it updates. So if that annoys you, I'd recommend setting the interval a bit higher.
6) Overheat Protection: Instead of manually checking whether the CPU temperature is staying clear of the Tj. Max, you can configure Core Temp so that it sends you an alert if it does hit that value. This can be highly beneficial when you're playing games with the CPU overclocked and you can't keep glancing at the temperature readings to make sure everything is running smoothly.
If you just want to keep an eye on your CPU's temperature and get alerts if it overheats, then Core Temp should be enough for your needs. However, if you also want to know what temperatures your other components are running at (includng the motherboard, CPU, graphics card and hard drives) then CPUID HWMonitor is what you're looking for.
First of all, head over to the official website and download HWMonitor. You can either download a ZIP or the setup. It really doesn't have an impact on how the app works. It's just that if you download the ZIP version, you don't have to go through an installation process.
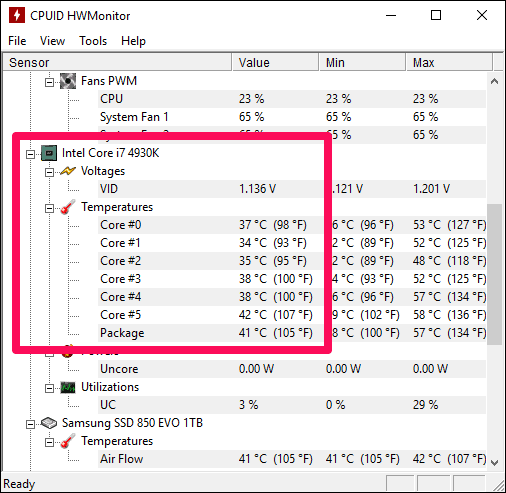
Once you've got it started up, you should see an interface like this:

As you can see, the interface contains information about each component in your system. For instance, in the above screenshot, you can see voltage and temperature readings of the motherboard. If you scroll down a bit further, you'll come across your CPU's information.
As with Core Temp, HWMonitor will list the temperature readings for each core inside your CPU:
In addition to voltage and temperature, you can also keep an eye on fan speeds using HWMonitor. This is quite handy while you’re overclocking, especially if your motherboard doesn’t come with integrated software for it.
And that’s all you can do with HWMonitor. Unlike with Core Temp, you don’t get some advanced features like overheat protection alerts.
In my case, I prefer to have just Core Temp installed because all I’m concerned about is checking the temperature of the CPU.
Unlike with Intel processors, measuring the temperature of AMD ones isn't all that straightforward. This is because the AMD processors actually display two temperatures: Core Temperature and CPU Temperature.
Core Temperature is a non-physical temperature, meaning that it's not reported by a sensor present on the CPU. It's measured on an arbitrary scale. In contrast, CPU temperature is read by heat sensor on the CPU's socket and is a phyiscal temperature.
If all that sounds confusing, don't worry too much about it. Here's what you need to know when you're trying to read the temperature accurately:
At low temperature levels, the CPU temperature is the more accurate measurement. However, when things start running hot, you should switch your attention to the Core Temperature. So while overclocking, you should only pay attention to the Core temperature.
If your CPU’s temperature does come close to its Tj. Max value frequently, then it’s time to do something about it. In this section, let’s take a look at what preventive measures you can take to prevent permanent CPU damage due to overheating.
Dust is one of the biggest causes of excessive heat buildup. Dust can get stuck on fun blades and weight them down, reducing their ability to blow away hot air. In certain cases dust can completely choke out the fans, essentially rendering the computer's entire cooling system useless.
In general, dust can reduce airflow as well, especially in laptops which are typically more cramped.
Because of this, I recommend cleaning out your laptop or desktop at least once every few months in order to prevent dust buildup from getting out of hand. If you’ve got a particularly dusty house, then perhaps you should clean more often than that.
Overheating is essentially a sign that your cooling system can't keep up with the heat that is generated by your CPU. In that case, it's only logical to try and upgrade it. Here are a few ways to do so:
1) Getting an Liquid/AIO Cooler: Liquid coolers are much better at dispelling heat than air coolers because water is a better conductor than air. Alternatively, you can have the best of both worlds if you get an All-In-One (AIO) cooler which contains both a water block as well as fans.
2) Adding more fans/radiators: It could simply be a matter of not having enough coolers. If you've only got a couple of fans at the moment, try adding more to improve the rate of heat dissipation.
3) Replace existing fans with more powerful fans: If your current fans have a pretty low max RPM, then you could replace them with more powerful ones. Aim for ones that can spin at 1500 RPM or more.
Sometimes the solution can be as simple as moving your computer to a spot in the house (or room) that's significantly cooler. For starters, you should never place your desktop or laptop near a heat source. This could be a heater, a fireplace or simply an open window that lets in warm sun rays. In general, CPUs perform better in colder environments because it defers heat buildup.
You might be tempted to place your PC tower on the floor, if you don't have enough space on your desk. However, this can restrict airflow because it completely blocks any vents present on the bottom. Carpeting can make this problem worse because it doesn't conduct heat and also it can accelerate dust buildup.
If you must have your PC case on the floor, then I recommend you get a PC tower stand. What this does is raise up the tower so that air can still flow out from the bottom.
If there's an excessive amount of parts crammed into a PC case, then there'll be less room for air to move about. This makes it hard to force hot air out and leaves less opportunity for cooler air to make its way to components.
Therefore, if it looks too cramped inside, I recommend revaluating what is essential and removing parts that you don't need. At the very least, you could try and manage your cables a little bit better. If neither is possible, then the only thing left to do is buy a bigger PC case.
Related Posts:
Thermal paste is a glue-like material that you apply underneath heat sinks during mounting. Thermal paste improves the rate of heat transfer between a CPU and a heat sink and the lack of it can lead to overheating.
However, in order to check whether there's enough thermal paste, you'll need to know how to remove the heat sink.
Overheating is a common problem when you’re overclocking or performing other processor-intensive tasks. That’s why you should get into the habit of tracking the CPU’s temperature. Both Core Temp and HWMonitor are fine tools and you should be taking advantage of their capabilities. I myself prefer Core Temp because of it pushes out alerts when the CPU is overheating.
In addition to tracking temperature, you should also make an effort to reduce the risk of overheating. There are several preventive measures you can take like cleaning up dust, moving the computer to a cooler spot, upgrading the cooling system and more.